

A Beginner’s Basic Guide for Creating Non-Fungible Tokens (“NFTs”)
As we all know, there is a big difference between having an idea and actually putting that idea into practice. NFTs are no different. I am intrigued by the concept of NFTs, and I believe that they can be used for positive purposes (see my earlier blog post on this subject https://thedealnet.com/blog/a-different-way-of-looking-at-non-fungible-tokens-nfts/), but I did not know how easy or difficult it would be to make one on my own. So, I did some research and sat down at my pc and actually created my own NFT. It was actually fairly quick and easy. In fact, it took me more time to write up this blog post than it did to create my first NFT.
As of this writing, I have not listed the NFT for sale. Some more on that later.
Below is a summary of how I did it, and at the end of this post I have put the links for all of the sites that I used. I have also added links for other sites that I have mentioned but did not use. And there are links for some source articles and general knowledge pieces that were helpful for me.
STEP 1: Select your item that is going to become an NFT.
- This step is free.
I decided that an easy way to start would be to use a photograph that I took with my digital camera because I figured that would avoid any copyright issues. So, I browsed through the memory files on my PC. Eventually I found a unique image that I took myself of some outdoor stone stairs. I saved a copy of the “Stone Stairs” photo in a location file on my pc that I could easily find later.
STEP 2: Create a crypto wallet account.
- This step is free.
I was on my pc, so I downloaded MetaMask, which also has a mobile version. It links to your Google Chrome account, so I did not need to enter any other data or information (no user name or password, and no credit card or bank account details). Because MetaMask will allow me to access any crypto currency or other assets that I may purchase on the platform, MetaMask provided me with a unique combination of 12 words, which are known as my “Secret Recovery Phrase”. Previously, this was called the “Seed Phrase”. I have to save and protect these 12 words because they constitute the master key for my crypto wallet.
Some other options that can be used instead of MetaMask include Coinbase Wallet, TrustWallet, and Portis, but I did not try any of these platforms.
STEP 3: Create an account for creating, selling, and buying NFTs.
- This step is free.
The platform that I used to create my NFT was OpenSea. I found it to be accessible and user-friendly on the pc, and OpenSea was available for me to browse once I had created my MetaMask account. In order to proceed to STEP 3, I had to register a user-name and email address with OpenSea. OpenSea then sent an email confirmation message to me, and I had to follow the link provided to finalize and activate your account.
OpenSea even has a guide for those of us that are new to the world of NFTs. I have included a link to this guide in the sources that I have listed below.
I have also read that Rarible and Mintable are relatively easy NFT platforms for beginners to access and use, but I only visited these other sites and have not yet tried to use them at all.
STEP 4: Upload your selected item onto the NFT platform.
- This step is free.
Using OpenSea, this process was very simple and straightforward. Once I was logged in, all I had to do was click on the “Create” menu item that is prominently featured in two places on OpenSea home page. That button took me directly to a fairly standard “drag & drop” or “browse” upload page. I followed the “browse” method, and selected my “Stone Stairs” from my pc files. It’s worth noting here that this approach has a size limit of 40 MB.
In addition to uploading my “Stone Stairs”, the creation page had some additional fields to complete. I had to name my NFT; I had to put a description of my NFT (in a moment of inspiration I described it in great detail as, “This is a photo of a set of stone stairs.”); and I was invited to add a link to my website (this seems like a very useful feature to use if I was a creator that would benefit from that).
The final choices to make on this creation page related to properties, levels, stats, unlockable content, and mature content. For this initial foray into the world of NFTs, I did not unpack or avail myself of any of these options.
Then I held my breath, and clicked on the rectangular blue button at the bottom of the page that was labeled “Create”.
STEP 5: Convert your item into an NFT.
- This step is free.
I was prepared for a slow loading bar, a spinning circle of dots, and some flashing lights. Behold the power of blockchain!
None of that happened. The linkage of my digital image to the blockchain was fully automated and instantaneous.
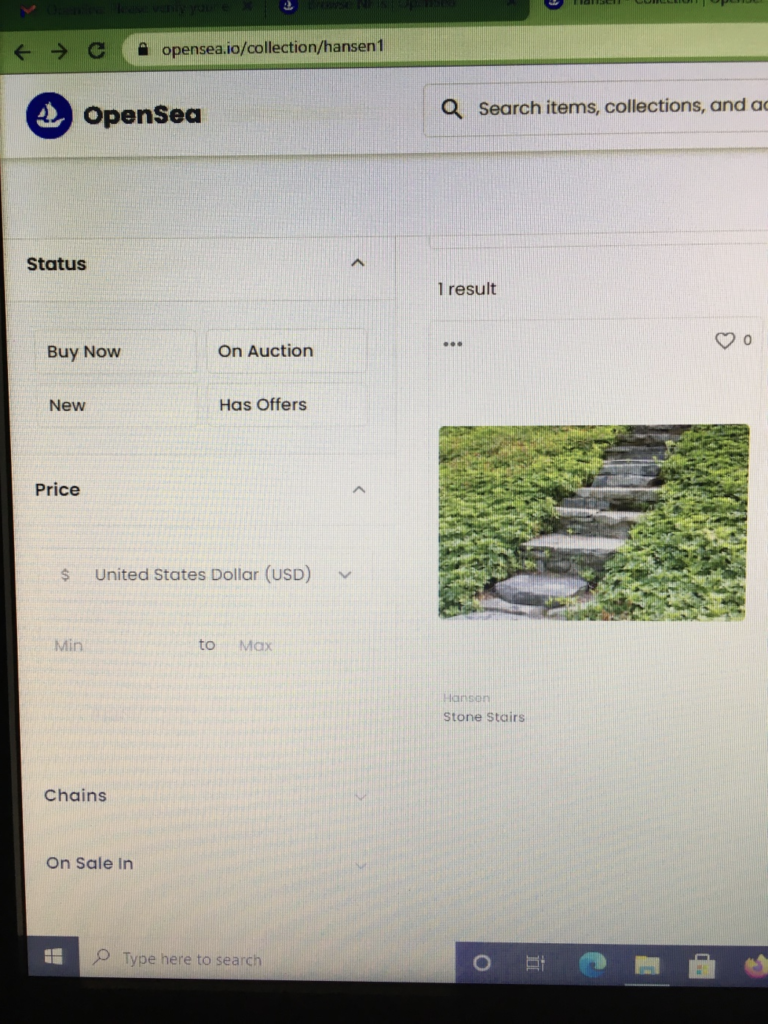
A split second later amid zero fanfare my “Stone Stairs” were presented to me. I had made an NFT! The page I was viewing on OpenSea showed that I was both the creator and the owner.
I am able to find my “Stone Stairs” on OpenSea. Here is a screen shot:
STEP 6: Sell your NFT.
- This step is NOT free.
OpenSea is flexible in terms of how I can try to sell my “Stone Stairs” NFT. I can set a fixed price for my item (the default crypto used by OpenSea is Ethereum – as of writing this post ETH 1 is worth a bit more than USD 3,500 – but other cryptos can also be specified). And I can set a time period during which my item would be available for sale at that price.
Private sales are also welcome. OpenSea has a feature that allows me to reserve my NFT for sale only to a specified buyer. I would like to know how prevalent this option has become.
I can also auction off my NFT, and OpenSea allows for either “English” auction (bids increase in price until the close of the auction with item going to the highest bidder), or “Dutch” auction (a price is set and declines over time until the price reaches an amount that a buyer has offered to pay). And I can set a reserve or not, and I can set the length of the auction. Auctions of popular items are automatically extended by 10 minutes if any new bid is submitted in the final 10 minutes of the auction.
As the adage goes, it takes money to make money. Even though I had successfully created an NFT for free, I learned that I would not be able to sell it without paying some costs.
OpenSea is quite open about their fee. They charge 2.5% for every transaction made on their platform. This percentage is taken from the amount that a buyer agrees to pay a seller for an NFT. So, any amount that a seller receives from a buyer would be “net” 2.5%. There is no fee charged to the buyer. My guess is that the amount of this fee will decrease over time if the popularity of NFT marketplaces continues to grow (as an example, look at all the no-fee online stock broker platforms that have proliferated during the last decade).
I was intrigued and tempted to simply list my NFT for auction. Being a lawyer, before putting the “Stone Stairs” on the auction block, I decided to dig further to see if there were any other charges that I would need to pay. The short answer is yes there are.
Firstly, OpenSea allows creators to earn royalties on any future sale of any NFT they make. The maximum amount of any royalty is 10%. The first sale of an NFT generates a royalty, so the amount of whichever royalty percentage the creator has put in place for the item is taken out from the sale price. Subsequently after the first sale of an NFT this amount is returned to the creator (the OpenSea resource hub states that this return takes about 2-4 weeks). After that, it’s more straightforward and any future sales of the NFT will earn the creator the relevant percentage royalty. So, royalties may not be a fee that I will have to bear as the creator of “Stone Stairs”, but it is something to keep in mind if one were to start trying to profit from buying and selling NFTs made by other creators.
Secondly, there is a concept in the NFT realm known simply as “gas”. Every transaction on the Ethereum network has a cost, and this cost is measured by “gas”. The cost of the “gas” depends on the demand for resources on the network at the time a transaction is processed. Before anyone can complete their first sale on OpenSea, they have to pay two gas fees, which I believe can only be calculated as of the time the sale of the NFT is finalized. My understanding is that future NFT sales do not incur gas fees.
– – –
For now I have not taken the final step and listed my NFT for sale. I am still both the proud creator and owner of “Stone Stairs”.
I hope that this guidance is useful for folks that are new to the NFT scene. Please feel free to update us here at TDN to share your NFT experiences and insights with us.
Links to referenced sites:
MetaMask: https://metamask.io/
Coinbase: https://www.coinbase.com/
TrustWallet: https://trustwallet.com/
Portis: https://www.portis.io/
OpenSea: https://opensea.io/
Rarible: https://rarible.com/
Mintable: https://mintable.app/
Sources and Further Reading
Feature Image: Proposed NFT Icon by MCH+ (see link)
https://www.cnbc.com/2021/03/23/how-to-create-buy-sell-nfts.html
https://www.businessinsider.com/nft-marketplaces-where-to-buy-sell-non-fungible-tokens-online-2021-3
https://opensea.io/blog/guides/the-beginners-guide-to-creating-selling-digital-art-nfts/
Chastity
/ 23 Nov 2021Very nice article. I learned a lot. I just shared it on Twitter.
Keep up the good work.
my site; Gilbert’s NFT Tips And Tricks
anjala jose
/ 26 Jan 2022Thank you for your comments and we look forward to hearing about what you think we should discuss?
anjala jose
/ 22 Oct 2022Thank you
FotoJoker.pl
/ 04 Jan 2022Great content! Keep up the good work!
anjala jose
/ 26 Jan 2022Thank you
rohit
/ 12 Nov 2022thanks
Harriett
/ 08 Jul 2022Pretty section of content. I just stumbled upon your web site and in accession capital to
assert that I acquire in fact enjoyed account your blog posts.
Anyway I’ll be subscribing to your augment and even I
achievement you access consistently rapidly.
my web blog – Twicsy
Shavonne
/ 06 Jan 2023Hey very nice blog!
Here is my web blog: https://gothammag.com/buy-tiktok-followers
Pingback:The Limits of Technology – Part I - thedealnet.com